 Icons from my youth.
I have a NASD Series 24 Exam.
I will be back next week.
I will be back next week.
 Icons from my youth.
Tag line:
Memory Lane
1 STATE YOUR INSANITY PLEA HERE
![]()
 Here is a picture taken in Yosemite Valley National Park last weekend. We happened to be walking on the southwest bank of the Merced River. The river was calm the surface was glassy smooth. I set up my tripod and snapped a few incredible images. Can you figure out if this picture is right side up or up side down? Hint look at the lighter spot in the upper middle left of the image.
 Unfortunately the pictures we took didn’t turn out as expected. The water level in the lake was low and the surface was partially covered in ice. The best time to photograph half dome is when the lake is at its fullest, in late spring.
 ginormous - gi·nor·mous Pronunciation: \jī-ˈnȯr-məs\ Function: adjective, Etymology: gigantic + enormous, Date circa 1948 : extremely large : humongous
 There were about twenty-five of us in the group, and the only person shooting on film was the guild. Some of his instruction was about film and darkroom processing. I noticed that 90% of the people on the tour had a strange blank look when he spoke about the use of film.
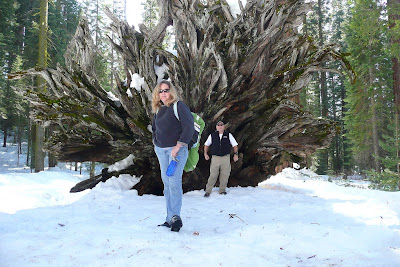
As the sun sets and the light starts to fade I witnessed a migration of animals. This wasn’t any ordinary animal this was the stalking photographer.
My wife and I had just emerged from the trail on our way back from the base of Yosemite Falls. We decided to cross north side drive and head into the meadow (sentinel meadow). The meadow was covered with snow. In some places we sank up to our hips in snow. This would make for some great pictures in the fail afternoon light. As I set up my camera on my tripod to take some pictures of Half Dome and the surrounding landscape, I witnessed a migration of photographers about 100 yards in front of my position. I would say there were about 30 or 40 photographers marching in a straight line into the middle of the meadow.
I thought this was a peculiar image so I captured the moment, of photographers lined up to take pictures of half dome. Once I got the shot I was looking for, I grabbed my gear and took my place in formation along the line.
Once I got set up I asked Kevin, a photographer from Fresno what was going on. He explained that during certain times of the year, as the sun sets, the last rays of light hit the upper part of the Yosemite Valley and turns Half Dome a reddish orange color. He continued to explain that capturing the image is a rare event due to the time of year (February) and weather related issues. Fortunately we were in the right place at the right time and it was going to be a good day to get a good photograph. The weather had cooperated all day and the sky was clear, almost too clear.
As time moved on and the valley darkened, we waited patiently in the cold. Did I mention that we are at 4000 feet elevation and in the middle of winter? Yes, it was cold and as soon as the sunlight disappeared in the valley floor the temperature dropped fast.
Finally, as we watched the shadow creep up the face, and you think that the magic light or as they put it the “color” wasn’t going to happen. Poof it happens. You see the color change on the face of Half Dome from the granite gray to a light pinkish orange. The color continues to deepen to a reddish orange. The “color” only lasts for a few minutes, and then it’s gone. Once the last of the magic color had gone, the herd of photographers packed up the 200+ thousands worth of photo gear, and retreated to the warmth of their cars. Since my arse was already frozen to point of no feeling, I decided to wait out the light and try to capture Half Dome in the very last light of the day.
I forgot about the feet. I couldn’t do it. I had to leave before I wanted to. My feet lost feeling, and I knew when that happened I was toast. I had to abandon my post and retreat to the warmth of the Element, and change my wet socks. At that point I was done.


農曆新年 is the traditional Chinese charters for the Chinese New Year. 2008 celebrates the year of the Rat 鼠.
Last year in 2007 was the year of the Pig 豬. My wife and I made the trip from southern California to San Francisco for the Chinese New Years Parade. The parade takes place on the last night of the Chinese New Year.
Last year I tried to capture a few images during the parade. It wasn’t easy. Low light, big crowds and moving targets. Plus once again I didn’t have a tripod. Do you see a theme here? Me without a tripod in times I need it most.


Tag line:
News
0
STATE YOUR INSANITY PLEA HERE
![]()
 Have you ever wondered how photographers take those great panoramic photographs? It is done a couple of ways. One way is to use an ultra wide angle lens like a FishEye lens. Nikon has a 10.5mm f2.8 lens, if positioned correctly (right in the middle) you will eliminate a considerable amount of curvature at the edges. Also you can purchase a special designed camera with a lens that rotates around the camera's rear nodal point.
 A few things need to be done first in order for these images to turn out exactly the way you saw it through the lens.
 Many programs are available to stitch these images together. Some are available online and others are provided in stand alone software. I prefer stand alone software. I use Photoshop not only for my post production adjustment, but it also comes with a great panoramic stitching feature. Photoshop is not cheap. Luckily I only had to purchase the upgrades. I very inexpensive stand alone version is made by ArcSoft Panorama Maker priced around $40.00. All this program does is stitching images for panoramics.
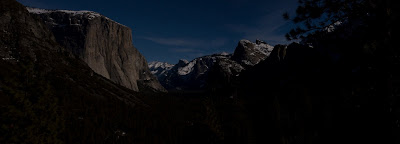
THE CLICK... BLOG HAS MOVED!
You will be automatically redirected in a few seconds. If not, visit
The Pixel Hoarder
and update your bookmarks.
