Photo by: Kirk Howard Copyright© 2008
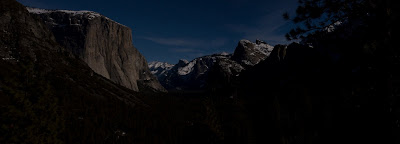
 Have you ever wondered how photographers take those great panoramic photographs? It is done a couple of ways. One way is to use an ultra wide angle lens like a FishEye lens. Nikon has a 10.5mm f2.8 lens, if positioned correctly (right in the middle) you will eliminate a considerable amount of curvature at the edges. Also you can purchase a special designed camera with a lens that rotates around the camera's rear nodal point.
Another way is to take a series of images and stitch them together with software. These pictures can be taken either in portrait or landscape aspect. Images are captured by panning the camera left to right.
 A few things need to be done first in order for these images to turn out exactly the way you saw it through the lens.
1. Use a Tripod. Not only will this help keep your image stable it will help to keep the camera on a constant focal plane.
2. Keep the Aperture and Shutter speeds settings constant. For example I take a light meter reading of the subject I want to photograph. The reading is Aperture 11f and the shutter speed is 1/250 sec. Keep these settings set for every frame of the pano.
3. Also I would overlap the images by 10% to 20% from frame to frame. This maybe the single most important step. I will explain why in a moment.
4. Use a remote trigger. This will help eliminate camera shake, and help keep the image from getting blurry by bumping the camera. Especially in low light settings.
After you have taken the images you wanted now comes the software to stitch these images together. This requires a program that is made specifically for this purpose.
Photo by: Kirk Howard Copyright© 2008
 Many programs are available to stitch these images together. Some are available online and others are provided in stand alone software. I prefer stand alone software. I use Photoshop not only for my post production adjustment, but it also comes with a great panoramic stitching feature. Photoshop is not cheap. Luckily I only had to purchase the upgrades. I very inexpensive stand alone version is made by ArcSoft Panorama Maker priced around $40.00. All this program does is stitching images for panoramics.
Five years ago, I first tried this technique with Photoshop 7.0. My first attempts didn’t turn out that great. I didn’t have a tripod, didn’t know about keeping the aperture and shutter speed constant. Plus my camera wasn’t the greatest at the time.
My next version of Photoshop, Photoshop CS worked better. Then came CS2 which I never used. However, towards the end of last year I discovered a little secret, Photoshop CS3. The program itself isn’t a secret, but the stitching function had been updated. In this newest version of Photoshop, they totally revamped and improved the stitching abilities for panoramics.
According to what I have read, most of the previous steps I mentioned above, do not need to be exact. However, Adobe insists that step three is a must. The overlapping is what makes this software perform its magic, and create nearly perfect panoramic images.
I still perform all the steps above. I feel that if I can do it right in the camera first, then I don’t need to spend much time in post production. Plus the stitching feature processes panoramics that much better.
Photo by: Kirk Howard Copyright© 2008

1 comment:
Kirk, nice post. I have tried to do this so many times & it looks horrible if you do it wrong. Of course I suck at photography, but that's a separate post.
Nice job though.
Hey, I saw this site & thought of you!
http://www.uncrate.com/men/gear/digital-cameras/canon-super-telephoto-1200mm-lens/
Post a Comment