Thursday, December 25, 2008
Tuesday, December 23, 2008
Blue Stars Bokeh...
My fist attempt of using a cut out to create bokeh. I think I only needed one star in the center, not the five or six I used. I will get better as time goes on... Blue Christmas light were the target of this image.
Bokeh is an adaptation from a a Japanese word meaning blur. In photography this term is used to describe the quality of the areas in the picture which are not in focus.When referring to Bokeh, we can distinguish some of it characteristics:
- Is the light/dark gradient smooth or sharp?
- What shape will a small dot of light take what it is in the Bokeh area? (mirror lenses for example, create a bagel like Bokeh)
We can play with those two variants to create a special Bokeh. Click... here.
Posted by Kirk
at 10:34 PM
Tag line:
DIY Projects,
Long Exposure Photography,
Techniques
0
STATE YOUR INSANITY PLEA HERE
![]()
Tuesday, December 2, 2008
You Blinked...
Nikon's update to last year's D3 is an $8,000 flagship aimed at the working professional.
By Stan Horaczek · Nikon
December 1, 2008
The full press release is below, but here are some highlights.
 FX-format, 24.5-megapixel (6048 x 4032) CMOS sensor
Five FPS at full resolution
12 and 14-bit capability
Dual card slots (CompactFlash)
5:4 Crop Mode for 8 x 10 shooting
7 FPS using DX-format lenses at 10.5 megapixels
ISO 100-1,600, expandable to 50 and 6,400
.12 seconds start-up time
3D Color Matrix Metering II
Multi-CAM 3500FX focus module, with 51 AF points
Up to nine available customizable presets
Tested to exceed 300,000 cycles for maximum durability and longevity
Viewfinder offers 100 percent coverage with 0.7x magnification
Up to 4400* shots per single charge of the camera’s Lithium ion battery
Shoots tethered or using the WT-4a wireless transmitter to eschew writing to cards
Available right now for $7,995
MELVILLE, N.Y. (Nov. 30, 2008) – Nikon Inc. today announced the D3X, an FX-format digital SLR featuring extreme 24.5-megapixel resolution and superb low-noise capabilities, which provides professional photographers with commercial-quality image performance in a familiar and extraordinarily versatile D-SLR form factor. In conjunction with the groundbreaking Nikon FX-format D3, the D3X tops off a collection of flagship level, rugged, professional caliber digital single lens reflex cameras engineered to excel in all types of professional photographic disciplines from photojournalism and sideline sports, to commercial in-studio applications.
The foundation of the enhanced performance of the D3X is its FX-format, 24.5-megapixel (6048 x 4032) CMOS sensor providing commercial, high fashion, fine art and landscape photographers with the extreme resolution, dynamic range, color depth, detail and sharpness that clients demand. Whether creating catalogs, magazine covers, billboards or gallery prints, the large 5.49-micron pixel size and high signal to noise ratio produces vibrant images with breathtaking image fidelity while reducing lost highlights and shadows, and ensuring smoother tone reproduction with minimized noise. With full resolution shooting speeds of up to five frames-per-second (fps), and 14-bit files, that when processed are approximately 138 MB, the D3X offers today's photographic artists an extreme level of performance and versatility ready for demanding assignments in the studio or on location.
“In 2007, the 12.1-megapixel FX-format D3 delivered groundbreaking digital SLR image quality, coupled with incomparable high ISO, low noise performance and high-speed handling. In doing so, the D3 broke photographic barriers, enabling photographers to work in ways never before possible,” said Edward Fasano, general manager for Marketing, SLR Systems Products at Nikon Inc. “Now, the new 24.5-megapixel FX-format D3X D-SLR provides the extreme resolution and high dynamic range capabilities needed to meet the extraordinary needs of photographic disciplines such as high fashion, commercial advertising and fine art. The D3X delivers this remarkable capability while fitting seamlessly within the Nikon system, taking full advantage of Nikon’s world-renowned collection of NIKKOR lenses and Speedlights.”
Image Quality Takes Center Stage
To re-emphasize the importance of image quality above all else, the D3X delivers an incredible level of digital SLR performance to provide photographers with extremely high resolution, exceptional dynamic range, phenomenal total gradation and outstanding color reproduction. Image files can be recorded as TIFF, JPEG or NEF (RAW) formats in either 12- or 14-bit compressed or uncompressed formats, and recorded to UDMA compatible CompactFlash™ cards for optimum speed. Photographers can save image files directly to the dual card slots as overflow, backup, or as separate file formats to different cards. Building on the D3X's flexibility, users have the creative option to shoot in the 5:4 crop mode with 20.4-megapixel resolution, the ideal format for creating 8 x 10-inch portraits. While using DX-format lenses, faster continuous shooting of up to seven frames per second can be achieved at a resolution of 10.5 megapixels.
The exceptionally low noise of the D3X is essential to any professional commercial application, and it provides photographers with an ISO range of 100 to 1600, expandable to 50 (Lo-1) and 6400 (Hi-2). The ultra smooth tones and lack of grain at ISO 1600 as well as at low sensitivity settings result in smooth, natural skin tones and exacting detail that, before the D3X, required larger and far costlier studio-bound camera systems.
Advanced Technologies, Meticulously Executed
In a commercial setting or on location, imaging professionals need high performance in both speed and processing. The Nikon D3X can shoot at up to five fps at full resolution or up to seven fps in DX crop mode, allowing photographers to catch the split-second difference in a model’s expression or capture all of the action in a sequence. Just like the D3, the D3X achieves a start-up time of a mere 0.12 seconds and a shutter release time lag of 0.04 seconds.
The D3X’s speed, as well as high levels of performance, leverages Nikon core technologies including a newly enhanced EXPEED™ Image Processing System, specially designed for the D3X to provide superior image quality, faster processing speeds and lower power consumption. This advanced system is able to achieve extremely precise color reproduction for a broad spectrum of hues, in addition to vivid saturation and smooth gradation. What’s more, Nikon’s advanced noise processing function is engineered to minimize noise at all sensitivities and operate seamlessly without interfering with other image color parameters.
The D3X also features Nikon’s exclusive Scene Recognition System, which continuously analyzes information from the 1,005-pixel RGB light sensor, to further refine auto exposure, auto white balance and autofocus calculations. This results in flattering portraits and awe-inspiring landscapes that portray accurate color and fine details. Nikon's exclusive 3D Color Matrix Metering II helps ensure accurate exposures, even in the most challenging lighting conditions. Instantly evaluating each scene before capture, input data from the system's sensor is automatically referenced against an internal database of more than 30,000 images derived from actual photographs to calculate correct exposure values. Active D-Lighting, used in combination with 3D Matrix Metering II, helps to determines proper exposure, and creates realistic contrast while compensating for lost shadows and highlights. Prior to shooting, users can choose from Extra High, High, Normal, Low or Off settings, as well as an Auto mode.
Additionally, the D3X features Nikon’s exclusive Multi-CAM 3500FX focus module, with 51 AF points, 15 cross type sensors and 36 horizontal sensors that easily track and lock onto moving subjects, delivering the same fast and accurate AF performance that helped make the D3 immediately successful. Users can select any of the AF points, making it easy to consistently attain accurate focus right on a subject’s eyes, frame after frame. Additionally, three AF-area modes – Single point, Dynamic-area AF and Auto-area AF – are available to maximize the use of the 51 focus points by selecting the most suitable one to match subject conditions. AF is also available in one of two Live View modes optimized for the studio, including a phase detection handheld mode and a tripod mode. This feature allows the user to zoom in up to 27x on the LCD screen to ensure critical focus. While in Live View, the graphic indication of a virtual horizon is also available, making it easier than ever to confirm camera orientation.
To further ensure each photographer's ability to balance their personal style, Nikon’s Picture Control System enables users to adjust their images to pre-set parameters such as Standard, Neutral, Vivid and Monochrome that apply tweaks to image sharpening, tone compensation, brightness, overall tone and saturation. Photographers have creative control over these image parameters with the use of up to nine available customizable presets.
Synchronizing Both Form and Function
Engineered for real-world functionality, the D3X retains a rugged shell with moisture, dust and shock resistance that has become a hallmark of flagship Nikon D-SLRs, while preserving the usability and ergonomics that allow the camera to remain an extension of the photographer’s vision. Attention to detail goes so far as to include a self-diagnostic shutter system that is tested to exceed 300,000 cycles for maximum durability and longevity. The camera’s body also maintains the resilient magnesium alloy construction and form factor of the D3, promoting consistent Nikon system synergy.
A bright and accurate viewfinder offers 100 percent coverage with 0.7x magnification. The body also houses Nikon’s acclaimed 3.0-inch super density LCD screen, now relied upon by so many photographers. The high-resolution 920,000-dot screen is viewable at wide angles up to 170 degrees, and will allow photographers to quickly zoom in to confirm critical focus. Users can also output the video signal to an external display via HDMI to allow client viewing. Thanks to incredibly efficient internal circuitry, the D3X can capture up to 4400* shots per single charge of the camera’s Lithium ion battery.
System Strength Withstands the Test of Time
The D3X is fully compatible with Nikon’s Creative Lighting System (CLS) to give photographers a mobile lighting solution that is easy to manage. To further enhance mobility, the D3X is compatible with Nikon’s GP-1 GPS receiver to gather information such as latitude, longitude, altitude and date of shooting. Photographers can easily shoot tethered via USB, or use the WT-4a wireless transmitter to send images wirelessly when speed and mobility are essential. D3X users will also enjoy the system strength of more than 50 genuine NIKKOR lenses that provide outstanding sharpness and high resolution across a broad range of focal lengths.
Price and Availability
The Nikon D3X will be available at Nikon Authorized Professional Dealers starting December 2008, and will be available for an estimated selling price of $7999.95.**
Friday, November 28, 2008
BLACK FRIDAY…
 I dreaded the holiday shopping season as a retail employee. In celebration of “Black Friday”, and that I haven’t worked retail for over 150 full moons, here are some shopping ideas for the photographer in your life.
1. Books are always a good idea. How to’s: for better technique. Amazon.com com has a great selection of photography books. Some great authors are Scott Kelby, Joe McNally, and Annie Leibovitz. Also, some other books are the Photo Workshop series.
2. Magazines are another gift that keeps giving for at least 12 months. There are a plethora of Photography or Photoshop magazines. Most of these can be purchased or ordered from the websites directly. Popular Photography (PopPhoto) is a great general magazine.
 2. Glass Blow Ornaments are always a good stocking stuffer. Here are some VINTAGE CAMERA ORNAMENTS.
 Another great gift resource comes from the guys at NAPP and Layers Magazine. It’s the Gonzo Holiday Gear Guide. You will have to navigate to different pages to see the entire gift guild, but it worth the looks. This is the 2007 Gonzo Holiday Gear Guide. The 2008 Gonzo Holiday Gear Guide version has been released, but you will need to purchase the Layers magazine to see this years toys. Stay tuned for an update.
Now if you haven’t noticed already, everything I posted can be had over the internet. I try to do most of my shopping this way. I hate having to deal with holiday shoppers and the nastiness it brings out in the average Joe.
 If you know what you are looking for and have a good idea what retail is for items, you can score some good deals on-line. Warning, be smart and wise and make sure the product and company is reputable.
That’s if for me. I will be braving the crowds at the Apple Store today. Apple usually has a one day sale on “Black Friday”. Apple is notorious for never selling anything under MSRP, except for “Black Friday”.
Good Luck and may the shopping be with you…
Tuesday, November 18, 2008
24 Beams of Light...
 This was my first year to Pigeon Point Light Station to watch and photograph the light of the old first order Fresnel lens. It was a fantastic opportunity to capture the beams of light emanate from the 24 prism panels in the lens.
They light was lit at 6pm and for the first five minutes they held the carriage still to keep the lens from rotating. Giving an untold amount of photographers the opportunity to capture 24 beams of light. After the first five minutes the lens rotates beaming a signature flash of light every ten seconds.
The closer you stood the lighthouse structure the more the beams were pronounced. It was amazing to see the beams of light streak past on the distant hillsides and in the ocean.
In the lantern room the bull’s-eye lens is 100' above ground to the focal plane of the lens. Also 150' (about) above sea level to the focal plane of the lens. This height compensates for the curvature of the earth. On a clear night, light has a visual distance of 24 miles from the ocean.
 It was announced on Saturday that this might be the last lighting of the Pigeon Point Lighthouse Lantern. With further investigation it may be discontinued until the necessary renovations are completed to fix the damaged lighthouse structure.
The reason why they may not light the lamp in 2009 is a safety issue and not a cost issue. The Coast Guard engineering studies report the structure may collapse if an earthquake or a very strong wind storm were to batter the lighthouse.
Over the years the sea spray and salt air have slowly decayed the exterior structure. In 2001 part of the west facing caprice fell (cornice on the exterior of the lighthouse fell off). The result was the closure of the Lighthouse Structure to the public.
According to Staff and California State Parks, lack the funding needed it to fix the lighthouse and lantern room. Current estimated figures are around 5 million dollars to repair and renovate the structure and rework the lens. Most of the funds required, have to be provided by private funding.
 Donations can be made to restore the Pigeon Point Light Station or to Cal. State Parks Foundation.
Posted by Kirk
at 6:09 AM
Tag line:
©opyright,
Landscape Photography,
Long Exposure Photography,
Techniques,
Travel,
Travel Photography
0
STATE YOUR INSANITY PLEA HERE
![]()
Wednesday, November 5, 2008
Hologram...
No matter how you vote last night or your political affiliation you have to admit technology is advancing and here to stay.
Last night as I watched election results on many of the major TV networks FOX, ABC, CBS, NBC, CNBC and CNN, I came across something amazing. CNNs Wolf Blitzer was talking to another reporter. At first I thought the reporter looked a little short, then I realized it was a projected image. Not only a projected image, but a hologram.
Take a look at the video clip it’s really cool.
Posted by Kirk
at 10:57 AM
Tag line:
©opyright,
Gear,
News,
Techniques,
Video
0
STATE YOUR INSANITY PLEA HERE
![]()
Tuesday, October 28, 2008
Artificial Bokeh…
This image was taken at San Diego Wild Animal Park in 2006 pre Nikon DSLR. All I was using was an inexpensive Kodak point-in-shoot. The camera took nice colorful images, but lacked manual adjustments. Unfortunately the camera didn’t allow the ability to create (DoF). The entire image appears to be on the same focal plane. I adjusted colors and contrast in Adobe Lightroom 1.41.

This next image I adjusted in Adobe Lightroom 1.41 and Photoshop CS3. I created a Layers Mask and added Lens Blur. I didn’t think that the adjustment I made was blurry enough so I did it again.
Since I am using an adjustment mask in Layers I switched to the brush tool. Selected a soft edge brush. I made sure my primary color was black and painted over the entire sheep. The black allows the Mask to be removed in top layer to reveal the bottom clear layer, resulting in an “in-focus” sheep. This creates an artificial Bokeh and or Depth of Field.

Now I fudged a little. If I really wanted to create a true DoF look, I would have made everything within the focal plane of the sheep in focus. Instead I just made the sheep in focus, I felt this made the animal stand out a little more.
Posted by Kirk
at 5:56 AM
Tag line:
©opyright,
Adobe Lightroom,
Adobe Photoshop,
Techniques
0
STATE YOUR INSANITY PLEA HERE
![]()
Monday, October 27, 2008
Err – (blinks)
Err – (blinks)
Problem - Camera malfunction.
Solution - Release shutter. If error persists
or appears frequently, consult with Nikon-authorized service representative.
I know this is a direct translation from Japanese, but come on someone needs a new way of writing product manuals. This isn’t rocket science it consumer electronics…
Really the only way I could get the Err to stop flashing was to turn the camera off and turn it back on again. This would give one maybe two shots before I had to do it again… What am I talking about, I will explain.
About two weeks ago I ran into an issue while taking pictures at the San Francisco Fleet Week. The crowd was loud, the planes were loud so I really couldn’t hear if anything was wrong with my camera. All I could tell was every so often an image would come out extremely under exposed.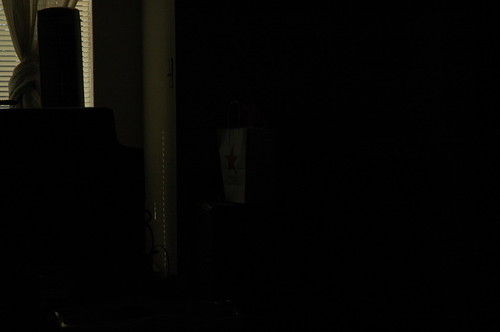
This issue started reoccurring more often to every other image would be so dark you could barely see the image. I first thought it was my CF memory card. I switched cards and got the same result. I decided that if it happened on a third CF card that it wasn’t a memory card issue. I was correct, in my assumption it wasn’t the memory cards.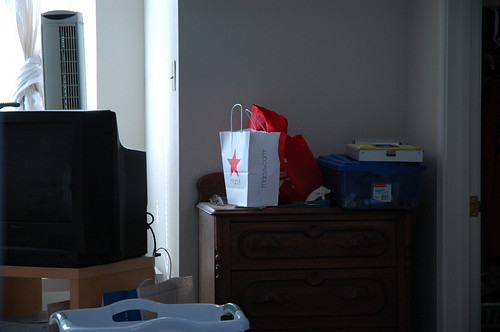
Next I decided to clean my camera really well. Now that my camera is so clean you could eat breakfast off of… this didn’t correct the issue.
This last weekend I decided to continue to use the camera. Still with an every other image black out. However, now I was getting a message Err. I continued to shoot through this, but I would need to switch the camera on and off every time the “Err” would appear. This was a drag, but I didn’t have another camera to use. Plus it would still produce images (sort of).
I did notice that as I pressed the shutter release, I no longer heard the smooth movement of the mirror. The action had an inconsistent lagging electric sound. When I would check the image, it would be dark. So for self diagnosis I determined I was experiencing what we would call in the film camera world “Shutter Drag”. This is when the shutter would no longer operate properly and without a smooth precise open and close of the shutter. The picture result would give you an extremely under exposed image. I think the same type of problem is happening to me and is caused by the movement of the mirror. Yesterday I took my camera back to the big box store where I purchased it in 2006. At the time of purchase I also spent the extra $100.00 for the extended service plan. I normally don’t purchase these, but on a camera (DSLR or Video) that is going to see some major wear and tear, I figure $25.00 and year was a good investment. Considering Nikon only gives you a one year parts and labor warranty.
The Geek Squad guy behind the counter that checked my camera in for repair made a good point. Most electronics manufactures only expect their equipment to last the length of the original warranty. Otherwise manufactures would offer longer warranties. Case in point major appliances i.e. washer, dryers and refrigerators, have you seen how long those warranties are?
I won’t have my camera back for 2 to 3 weeks. If for some reason they cannot fix or repair my camera or the cost of repair is more then to replace the camera they will refund the money and let me pick out a new camera. Not a bad deal considering the cameras have improved greatly and if I wanted to upgrade to a Nikon D300, it would cost relatively little out of pocket.
All I can do now is wait for the call…
Friday, October 24, 2008
Lets Bokeh...
Bokeh - is a photographic term referring to the appearance of out-of-focus areas in an image produced by a camera lens using a shallow depth of field. Different lens bokeh produces different aesthetic qualities in out-of-focus backgrounds, which are often used to reduce distractions and emphasize the primary subject.
I use a couple different lenses to achieve Bokeh. The lens that works the best is the Nikon Nikkor 50mm f/1.8. The 50mm lens allows me to have the greatest versatility with a great range of aperture range. Te other two lenses are the Nikon 18-200mm f/3.5-5.6 and my 80-200mm f/2.8. All these lenses achieve a great depth of field and much defined bokeh. But the best is still my inexpensive 50mm f1.8.
Another way I create bokeh is artificially in CS3. Sometime if I want to have a subject pop out of the background or my depth of field isn’t shallow for the effect I create the same effect using lens blur or Gaussian blur in layers.

The same image with an artificial lens blur layered over the image.

This is also the same image with layer mask, to allow the center of the picture to be clear.

Posted by Kirk
at 6:10 AM
Tag line:
©opyright,
Nature Photography,
Software,
Studio,
Techniques
0
STATE YOUR INSANITY PLEA HERE
![]()
Tuesday, October 21, 2008
Galapagos Diving...
I found this on Vimeo. I thought it was awesome. It's seven minuets long but worth watching. Kirk Out
Galapagos from Darek Sepiolo on Vimeo.
Posted by Kirk
at 5:52 AM
Tag line:
Nature Photography,
Techniques,
Travel Photography,
Video
0
STATE YOUR INSANITY PLEA HERE
![]()
Tuesday, October 14, 2008
Blue Diamond
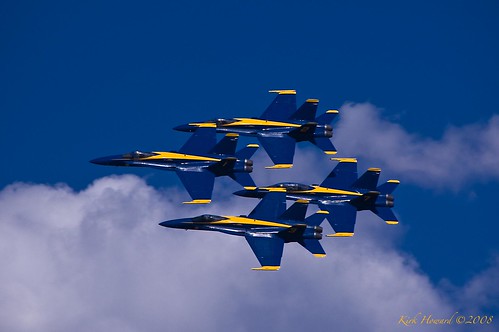
Fleet Week is over and all the planes have gone. I walked to Pier 41 on Friday. Not the best vantage point to shoot the air show, but it was better then nothing. I took photographs from the Marina Green last year. Pier 41 gave me a different look at the planes.
Sunday was the fun day. I got up early and got to my secret spot by 11:15 AM. At 2:30 PM my secret spot wasn't very secret anymore. This spot puts me right under center stage and in front of the crowds.
The above image was taken on Friday October 10, 2008 at Pier 41. This was media day and practice for the Air show. Blue Angels flights 1 thru 4, however flight 4 has been replaced by flight 7. Blue Angel #7 is the two seater F/A-18. If you look carefully you will notice someone in the RIO position (Radar-Intercept Officer). This seat is usually set aside for media or dignitaries that get the rare privilege to fly with these amazing machines.
I only have one question. When’s my turn?
The Blue Angels from Joe Bloggs on Vimeo.
Posted by Kirk
at 5:52 AM
Tag line:
©opyright,
Aviation Photography,
News,
Video
0
STATE YOUR INSANITY PLEA HERE
![]()
Friday, October 10, 2008
Black, White & Blue Angels
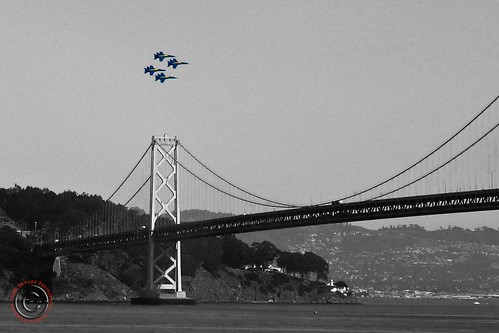
Blue Angels are back in San Francisco for Fleet week. Yesterday they spent two hours running survey flights from 1:00 PM until 3:00 PM.
This is a shot I took from my office window yesterday, as flights BA-1, 2, 3, 4 headed back to San Francisco International Airport after practice. It was a lucky shot. I took this image with my Panasonic DMC-TZ3 camera, through a tinted plate glass office window, and the Blue Angels cruising at 450 knots.
Blue Angels shows Friday, Saturday and Sunday from 3:00 to 4:00 PM. The rest of the air show will start at 11:00 AM including the Canadian Snowbirds.
Here is the link: www.military.com/fleetweek
Notes: Converted the JPEG to Grayscale in Lightroom. The painted with light in CS3 using a little of Scott Kelbys seven point system.
Tuesday, October 7, 2008
The Wordle Around Me
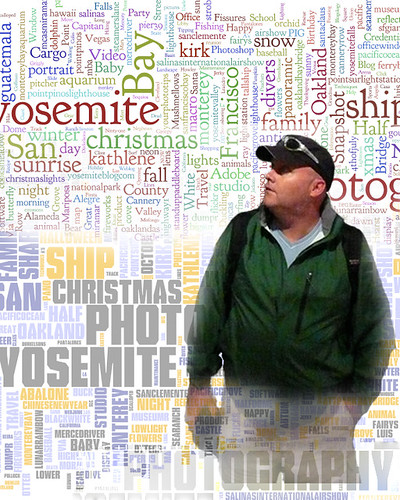
It was a slow day at work today (Oct. 3). While I was sitting at my desk, I remembered a conversation I was having with Magellan. She asked me if I had ever used Wordle? I said that had not, but I knew what the program was…
While I was sitting at my desk I thought It would take a stab at Wordle. I thought it would be interesting to take all the tags that I have used in Flickr, Zoomr, SmugMug, Photosig and all the blogs I had contributed in the past year.
This is what I came up with, and I titled it “The Wordle Around Me”.
I did the blending of the two wordle.com pages in PS CS3 along with combining the shot Magellan took of me in Alcatraz Island, San Francisco. I did all the PS work on my flight from Oakland, CA to San Diego, CA
Posted by Kirk
at 1:36 PM
Tag line:
©opyright,
Adobe Photoshop,
Image Community,
Portrait Photography,
Software,
Techniques,
Useless Information
0
STATE YOUR INSANITY PLEA HERE
![]()
Friday, October 3, 2008
Heading South...
Friday, September 26, 2008
Good to go…
I found my iLife 08, it was right were I left it. Actually it was with the supplemental install dicks. Remember those two grey disks labeled Disk 1 and Disk 2, well that’s where it was. It was confusing at first because when you install and run Disk 1 it shows you Mac OSX Tiger. Tiger is the old OS, which is why I was confused. You have to run Disk 1 first then Disk 2. Disk 2 is where the iLife 08 lives.
As of 10:00 PM Wednesday night, I completed the install of the last program MAC: Microsoft Office 2004. All I have left is to pick and choose some files to migrate back and some plug-ins for web based programs.
I am really glad I did this clean install and erase. When I purchased his MacBook Pro last year in Dec. I thought it was cool and easy to migrate all my user information that was on Magellan’s MacBook to my new computer. What I didn’t know, was this would migrate everything. Programs, plug-ins, files, folders, music, and anything else I didn’t want.
My notebook has a 120 GB HD, when I was done I had 60GB left and the 40GB of photos I have taken since last December took up of the rest of the hard drive. The is why it became very sluggish.
After the clean install of Mac OSX Leopard and only installing the MS Office 2004, Adobe Lightroom, Toast, iLife 08 and one copy of Photoshop, I still have a ton of room. According to the internal HD info I have used 20.3 GB that leaves almost 97 Gig of free clean space. My computer runs faster and the fan doesn’t run as often.
Time Machine works great on my 1 Terabyte external HD. Once Time Machine is set up, I plug the HD in either with the USB or Firewire connection and Time Machine does the rest for me. It backs up my system every hour.
When you initially set up Time Machine it will take longer then usual to back-up your system. However, every time after that It only backs-up the changed data. All other data is left the same unless it had changed.
My only issue that remains is trying to hook up the 1 TB hard drive up to the Airport Extreme to back up wireless. I can see the drive and download/upload to it, but the Time Machine program will not work through the Airport Express.

Posted by Kirk
at 6:00 AM
Tag line:
DIY Projects,
Gear,
Maintenance,
Techniques
0
STATE YOUR INSANITY PLEA HERE
![]()
Wednesday, September 24, 2008
Half-on, Half-off... My install is Half Done.
Start - 4:00 PM September 23, 2008
Finish – To Be Determined
After spending a few hours backing-up and doing an “install and erase”, will say “it was a success we have ignition.
As I left my house this morning at 4:30AM the 1 terabyte external HD was still going through its MAC OS Extended Journaled rewrite. When I checked on the process as I walked out the door, it still had three hours left… Whoa! My only hiccup has been I cannot find my iLife 08’. I checked the Leopard install, I also checked the separate MAC OS install bundle disks.
Once I get the iLife 08 figured out I will finish the migration and software install.
Update to follow…
Posted by Kirk
at 9:54 AM
Tag line:
DIY Projects,
Gear,
Maintenance,
News,
Techniques
0
STATE YOUR INSANITY PLEA HERE
![]()
Tuesday, September 23, 2008
OFF-LINE...
Today is the day I make the migration to two new storage platforms. Before I make the move, I will be making a clean slate.
1. Back-up existing files and folders (twice)
2. Make new list of necessary software to reinstall
3. Create virtual image of software.
4. Double check system
5. Triple check software and system.
6. Reformat internal HD
7. Reload OS
8. Download critical upgrades
9. Verify OS functionality
10. Make virtual image of HD
11. Initiate Time Machine on New External HD
12. Make additional virtual image.
13. Reload software
14. Migrate file and folders back to internal HD
15. Test system and Bob’s your Uncle.
Goggles… check! Hard Drives… check!, Software… Check! Patience… Double check, CHECK!
Wish me luck I'm going in…
Safety First…
 Well it’s time… It’s time to talk about storage and backing up files. If you are like me and in the last year, you've shot over 10,000 pictures, and have them stored on your laptop or desktop computer, you could be setting yourself up for catastrophic failure.
If your internal HD fails and you don’t have a backup of your files you may not recover them. Could you image losing all those important birth, wedding or vacations photos?
A little over a year I purchased a portable external HD from the now defunct CompUSA. It is a FireLite 160GB HD made by SmartDisk. It was on sale for around $119.99.
It has been working great for a little over a year. I carry it with me wherever my laptop goes. Recently, I have noticed some very funny noises coming from the FireLite. It has a high pitched pulsing sound, like a fazer set to stun. I am also having a connection issue with the USB connection on the FireLite itself.
Through some inquiry, it was determined that my FireLite hard drive was going to fail. At the same time I noticed that my internal HD was filling up with less then 2 GB left for storage. So being the tech savvy guru that I am, I was stunned and panic set in.
Fortunately, a few months ago I had read a few stories about other photographer’s misfortune of hard drive failures and complete data loss. Many of these photographers have instituted a back up regime that would rival data storage of some Fortune 500 companies.
I took what I thought would work best for me and incorporated it into my daily chores.
1. After shooting I download the memory card into Adobe Lightroom and onto my internal HD.
2. I remove the card reader, but I do not reformat the CF memory card until I do the next two steps.
3. Copy the new folder onto the external hard drive.
4. Burn two hard copies for permanent storage. One copy I keep at the house the other I keep offsite. (Safe Deposit Box) (In-laws house)
5. After I do the above, I will reformat the memory card and sort and edit the images.
6. Quarterly, I will combine all photos taken in the last quarter onto one Doubled Layer DVD.
Recently I replaced the FireLite with a new Western Digital (WD) MyPassport Elite 320GB $119.00 @ Costco. I also purchased a WD MyBook 1TB external hard drive $189.00 @ Costco. I will be incorporating an auto-backup (Time Machine) into my daily chores. Prices have dropped tremendously since my FireLite purchase. Shop around and get what best fits your need. Weather it is Apple’s Time Capsule, Data Robotics’s Drobo or even a MAD DOG external hard drive enclosure.

Some other storage options are online storage two notable companies are Carbonite and iDrive. They both run about the same price annually $49.99. The features from both companies are also similar.
I know this seems like a lot of work, but it has already saved my arse once, for me that was worth all the time and money I have spent making backups.
Friday, September 19, 2008
Photographer of Light…
 One of Magellan’s favorite artists is Thomas Kinkade, the Painter of Light. She loves him so much just his spoken name wants to make her puke. Actually even though Magellan thinks the guy is paint by numbers artist, she admires his business skills and the ability to make a fortune out of a pile of crap.
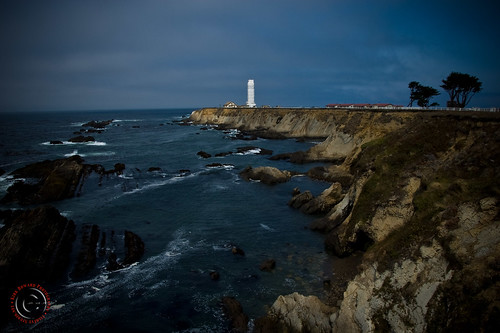
Last weekend for our anniversary we drove south on Hwy 1 on our way to Cambria. During our trip we stopped (Forced at Lens Point) at famous landmarks i.e. Bixby Bridge, Point Sur Light Station and Julia Pfeiffer Burns State Park.
During the Point Sur stop we took a Three Hour Tour of the Light Station. The Point Sur State Park offers two tours, one at 10:00AM and another at 2:00PM. Once you begin the tour you can’t leave, nor can you not go and stay in your car. This tour is either all or none. I recommend the tour it is well done and the restoration is almost complete.
The Point Sur stop gave me the opportunity to get closer to completing my project. While on the tour I made the remark I was the Photographer of Light. It was a spoof of Thomas Kinkade and his paintings of Lighthouses.

Have a good weekend…

Posted by Kirk
at 6:00 AM
Tag line:
©opyright,
Landscape Photography,
Travel,
Travel Photography
0
STATE YOUR INSANITY PLEA HERE
![]()
Tuesday, September 16, 2008
Intellectual property...
cartoon furnished by Clay Bennett @ http://www.claybennett.com/ 
Creative rights infringed? Well according to an article and blog post at Your Photo Tips by Damien Franco the mega giant corporation of 3M has blatantly violated Intellectual property (IP) of Scott, a photographer and Flickr enthusiast.
Social media is such in important part of today’s photographer (hello Flickr) that even big media companies like 3M want to get involved. Only they really screwed a photographer on this one. You have to read this article on how a big budget campaign wouldn’t even pay a photographer a fraction of their marketing campaign money for creative license. It’s absolutely disgusting.
Thanks to Damien Franco for pointing this story out. If you get a chance take a look a Damien Franco’s Flickr page.
Click… here, to read the rest of the story.
Friday, September 5, 2008
Trash the Dress...
 I barrowed this from the Strobist blog. This great a photo shoot on the beach. Some very clever ideas and great inspiration for location portrait shots.
I really like the kite camera setup for the Canon G9. I would like to know how they did that?
Have a great weekend, mine started today. I off to hunt the allusive Great White Snail, also know as Abalone. I will post some shots from our trip.
Chasing Sunset - Part II from Pieter Van Impe on Vimeo.
Thanks to Didier Jouret, who sent me a link to this video from a Pieter Van Impe "Trash the Dress" -type shoot.
This one is not so much about lighting, but it does include all of the typical stuff: Beach, sunset, trippy beats, happy couple, some champagne, a little nipple pinching, a kite-mounted Canon G9 for overheads, ... wait, WHAT?
Dude, I so want that G9 kite mount. He uses the G9 on a monster light stand, too.
Related links:
:: Pieter Van Impe ::
:: Tom Museeuw ::
:: Bridseye Kite Aerial Photography ::
:: Didier Jouret :: (Videographer)
Posted by Kirk
at 5:30 AM
Tag line:
Blogology,
Lighting,
Portrait Photography,
Video
0
STATE YOUR INSANITY PLEA HERE
![]()
Thursday, September 4, 2008
NFL Network...
For those of you who didn't catch tonight's game, the NFL has a new toy on NFL.com. The NFL has a new feature streaming live game coverage. The NFL will now allowed us Internet types to watch games over the net for free. The new feature is really cool. It allows you to watch five different camera angles, by clicking on the one you want to watch and that will be superimposed as the main screen.

Clowns...
Luckily it hit on the hood that was reversed in its storage position. A few scrapes and burses, but I think it survived.
On Tuesday night I ran it through some up close tight test. The middle and right image is soft due to my fault. I focused on the wrong spot. I will do more testing for a more definitive answer.
Whew! What a break…
Posted by Kirk
at 5:30 AM
Tag line:
©opyright,
Adobe Lightroom,
Gear,
Macro Photography,
Techniques
0
STATE YOUR INSANITY PLEA HERE
![]()
Friday, August 22, 2008
FX vs. DX compairason
 Back to more interesting stuff. Since I have been a slacker, I am going to borrow a little tid-bit from the Digital Photography School blog. If you haven’t been to this site or blog make a must see on your daily surf trip. I have picked up quite a few tips. I even find myself checking the site out and searcher out techniques and how to’s.
Wednesday, August 20, 2008
Forgiveness...
Last Saturday after my Exam I took the SF MUNI to Powell St. From there I took the Bus 27B and headed into the Mission Dist. of San Francisco. I was dropped off at Bryant and 18th. The corner where Calumet Photographic store is located. I walked in looking for inexpensive studio/portrait lighting. (Blog for another day) While I was there they had one of the new Nikon D700 out for buys to play with. It was the first D700 they had taken possession of, and everyone drooling over it, including the staff.
 Back in October I blogged about Nikons Double D’s. Here is the rundown. The D3 is the top of the spear for Nikon. A full frame (FX) sensor for professionals. The D300 is Nikon’s next greatest camera second only to Nikon’s D3. The D300 is not a full frame sensor, but is the DX sensor with a conversion factor of 1.5x to achieve the 35mm equivalent.
Thump… did your hear that? It was the other shoe dropping. Nikon at the end of July, to the unexpected surprise of the photographic community released the D700. It has everything the D3 has but in the D300 body. That’s right! It’s a full frame (FX) sensor in the smaller lighter weight body of the D300. The D700 even offers features that the D3 doesn’t have like the self cleaning sensor. If you have ever had a dirty dusty filter… What a pain in the patoot.
The biggest difference between the D3 and the D700 is the price tag. The D3 is an astronomical $4,999.99; the D700 is a Mountainous $2,999.99 not bad for a full frame camera. Then their is the D300. I think you can pick up a D300 for a mere $1,649.99 (body only).
 Here is a list to Click… for reviews of the D700:
Click… here
1. The Nikonians
2. dpreview
Tuesday, August 5, 2008
Where's Matt...?
Where the Hell is Matt? (2008) from Matthew Harding on Vimeo.
Posted by Kirk
at 9:03 PM
Tag line:
News,
Travel,
Travel Photography,
Video
0
STATE YOUR INSANITY PLEA HERE
![]()
Contraption...
Sometimes one stumbles upon something that is truly amazing. This (text and video) were sent to me in an email. Please read the text first then watch the video. The mechanically inclined will really enjoy this. __________________________________________________________________________________ This is just way TOO cool a video. You have to see it to believe it (but be sure to first read the text intro below).
If you thought that the people who set up a room full of dominoes to have them knocked over later was amazing, you haven't seen anything yet. There are no computer graphics or digital tricks in these images. Everything that you see happened in real time exactly as you see it.
The recording required 606 takes and in the first 605 takes there always was something, usually of minor importance, that didn't work. It was necessary for the recording team to install the set-up time after time and it took several weeks working day and night to achieve this effect.
The re cording cost 6 million dollars and it took 3 months to finish, including the engineering design of the sequence. The duration of the video is only 2 minutes, but every time that Honda shows the commercial on British television, they make enough money to support any of us for the rest of our lives. However, this commercial has turned out to be the most displayed in the history of the Internet. Honda execs think that it will pay for itself simply because of the free showings (Honda is not paying one cent for you to see it)
When Honda senior execs viewed it, they immediately approved it without hesitation-including costs. There are only six Honda Accords built by hand in the whole world, and to the horror of Honda engineers, the recording team disassembled two of them for the recording. Everything you see in the sequence (besides the walls, floor, ramp and untouched Honda Accord) is part of those two automobi les.
The voice is that of Garrison Keiller. The commercial was so well received by Honda execs when they saw it, that their first comment was how amazing the computer graphics were. They almost fell out of their chairs when told that the recording was real without any graphics manipulation.
Friday, August 1, 2008
Lightroom® Too...
 As everyone knows in the photography community Tuesday was the big release of Adobe® Photoshop® Lightroom® 2. I have spent the last few days poking, prodding and testing the new software. I still haven’t completed my under-the-hood check-out, but so far I like what I see.
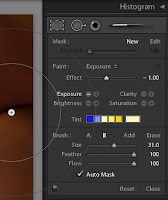 One of the things that stand out is the layout. In the develop module is where I have seen the biggest layout change. Most of the tools i.e. crop, red eye adjustments are now in the left menu bar. Before they were positioned under the image workspace.
Also, a major new item is the ability to make adjustments to localized areas of a photograph vs. the entire photo. You can also burn a dodge your images. Previous this was not a feature of Lightroom® I, only in Adobe® Photoshop®.
Tuesday, I spoke to Thomas Hawk (Flickr) of the infamous Thomas Hawk’s Digital Connection. We discussed the new Adobe® Photoshop® Lightroom® 2. Thomas has been a big user of Adobe® Bridge®. Over the year he has a developed a great workflow in Bridge® that has work very well for him. In a previous conversation month back, I asked if he was using Lightroom® I? He had said he tested the software, and that Bridge was a better fit for his workflow.
However, Tuesday produced a different response from Thomas Hawk. He said he really liked the new Lightroom® 2, and was going to start using this Photo management software, now instead of Adobe® Bridge®.
Thomas Hawk has put up his own review of the new software which you can read it here. Click… Here. I will check back with him at a later date to see how he still feels about Lightroom® 2 or find out if he has gone back to Adobe® Bridge®. “The Proof is in the Pudding”.
That’s it for me. Have a nice weekend. Keep you focus sharp and you lens clean.
Tuesday, July 29, 2008
Lightroom 2
 Today Adobe® Photoshop® Lightroom® 2 software released. It has been a highly anticipated release of a very popular photo management and editing software.
In April 2008 Adobe Labs released the BETA for Lightroom 2. According to the information released by Adobe over 130,000 copies were downloaded.
I did not download the BETA version, so do not have any fist hand experience on the software. However, I am an avid user of the first version of Lightroom. I think it is a great tool. Most of my images posted to this blog and others have been adjusted with only the Adobe Lightroom software. For photography work flow and management, I don’t think there is better software out on the market. For features of Adobe® Photoshop® Lightroom® 2 Click… Here. Check out the upgrade comparison chart Lightroom 1 vs. Lightroom 2. Click… Here
Check out Matt Kloskowski blog, Adobe Photoshop Lightroom Killer Tips for additional information and news. Click… Here.
Friday, July 25, 2008
Morning Quickie...
Good Morning,
Just a quick post today. I am tired and don’t feel like putting much effort into this post today.
However I did run into a funny mock portrait photo shoot online. It is an ad campaign for the Subaru Forester. If you get a chance check it out. Link: Photo Shoot. If that link doesn’t work try this link, Click… Here, you may have to root around the web site for the gallery.
That’s it for me today, short and sweet. Have a great weekend; keep your lens clean and your focus sharp.
Wednesday, July 23, 2008
Barque Eagle...

 Once again my office window presents a unbelievable view. The USCGC Eagle is parked outside my office window at the moment here is a snapshot of the 295 ft. Barque class sailing vessel, ordered and commisioned by Adolf Hitler, built for Nazi Germany and used by the Third Reich as a training vessel.

Update-
The Festival of Sail starts today at 12 noon with a Parade of Tall Ships along the Bay – ending at the Bay Bridge at around 1 pm. It will be a great experience for you all to see. Take a look from your shop or office windows, stand along the bay side promenade to experience a majestic display of 32 Tall Ships!
Route & Parade Duration
These majestic marvels of medieval engineering, from ports of call all over the world, will make their way past thousands of spectators lining Crissy Field, Marina Green, Fort Mason, Aquatic Park, and locations all along the Embarcadero. The first vessel will pass under the Golden Gate Bridge at Noon. The Parade will last approximately 1 1/2 hours from start (at the Golden Gate Bridge) until the finish (Bay Bridge). Once the vessels pass under the Bay Bridge they will sail to their respective berths. Vessels will be open for tours beginning Thursday July 24th at 10:00 am.
For more information on touring vessels docked at Pier 3 just north of the Ferry Building – or activities at Justin Herman Plaza please visit: http://www.festivalofsail.org/schedule.asp
